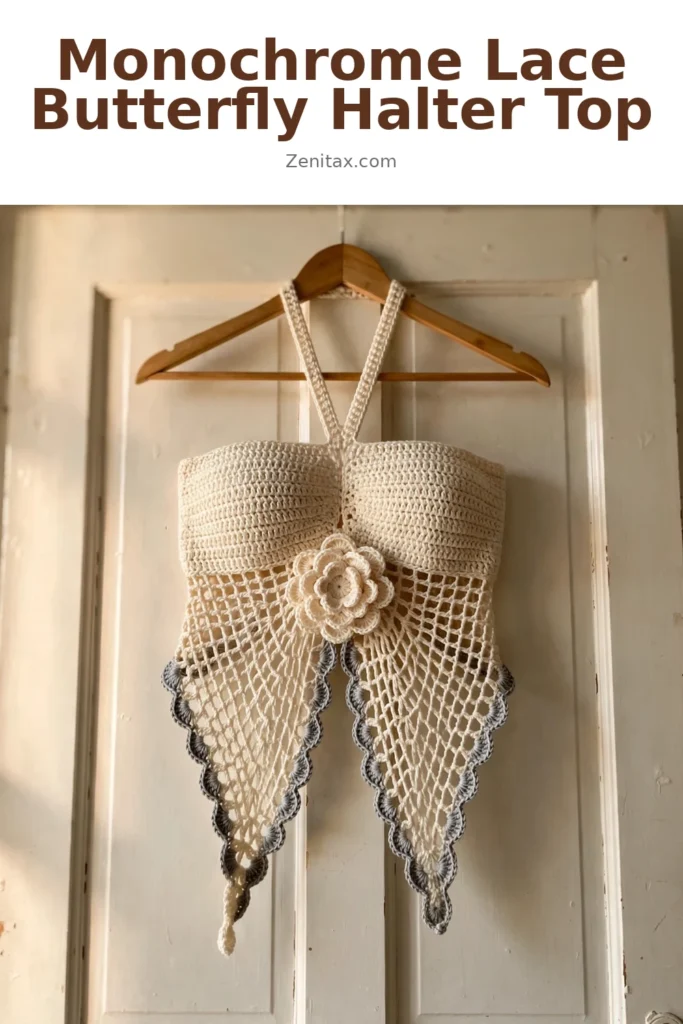
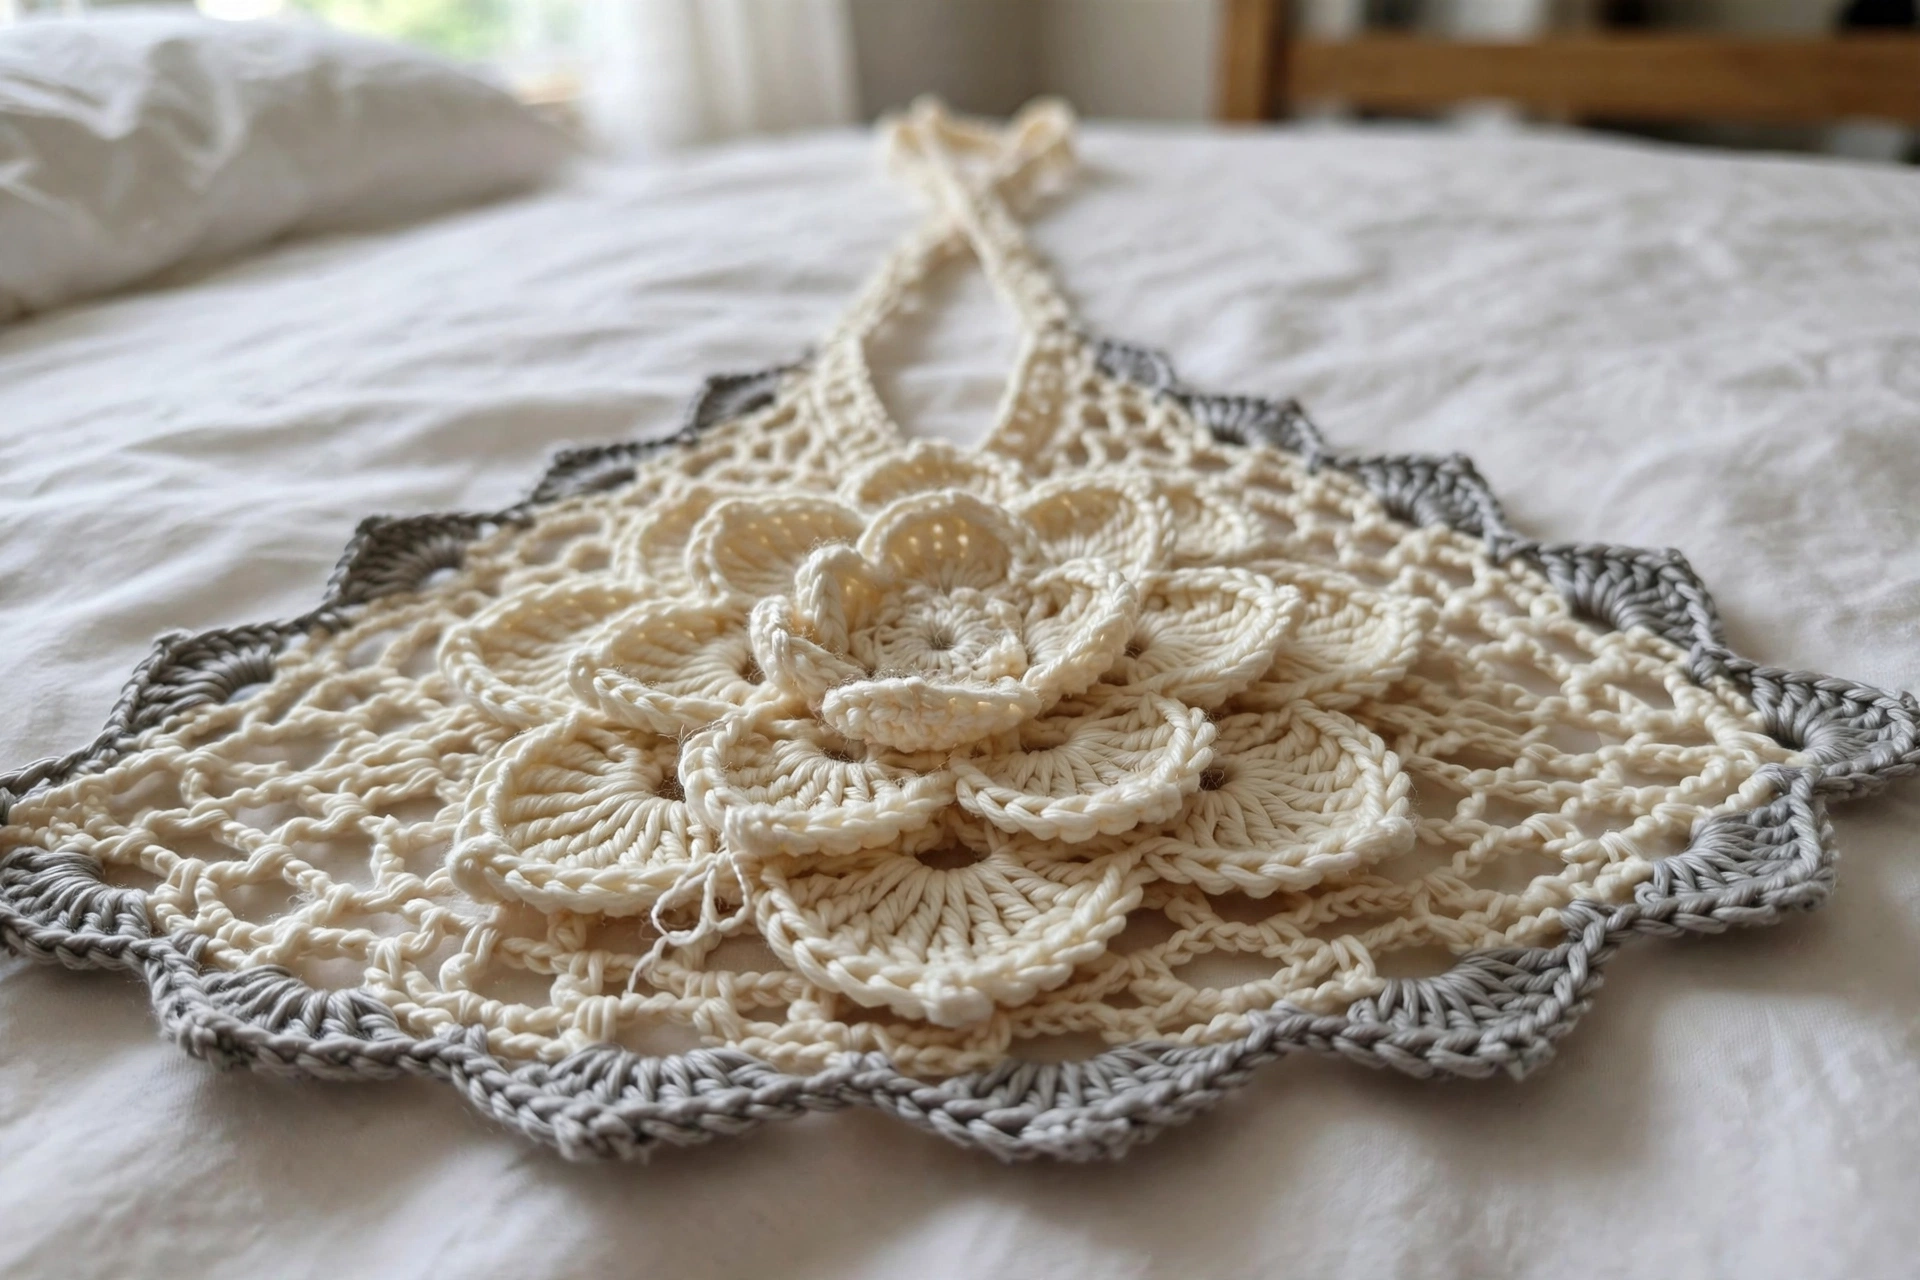
You know that gorgeous skein of cotton yarn sitting in your stash? The one you’ve been saving for “something special”? This is the project it has been waiting for. The Monochrome Lace Butterfly Halter Top combines a structured bandeau bodice with dramatic open mesh panels that taper into elegant pointed tails — plus a layered flower applique at the center front for the perfect bohemian finishing touch.
Let me be honest about the skill level: this is intermediate. If you’ve tackled three or four moderately complex pieces and feel confident with your tension, you’ll do beautifully. If you’re brand new to crochet, bookmark this one and build up to it. The mesh geometry and flower assembly require some experience, but nothing here is beyond reach with a bit of patience.
Why This Halter Top Works
This design solves a real problem. Most crochet tops either look homemade in a bad way or require an engineering degree to construct. This one hits the sweet spot. The solid bodice provides genuine support and structure. The mesh panels add drama and movement without being fussy. And that two-tone color scheme — cream body with soft grey edging — looks sophisticated without being complicated to execute.
The butterfly tail effect at the front is the real showstopper. When you move, those pointed mesh panels sway beautifully. The back features a smaller tail so all the attention stays on the front. It’s asymmetrical on purpose, and it works.
Materials You Will Need
Yarn A (main color, cream or off-white): Approximately 550 yards (503 meters) of worsted weight yarn, 100% cotton or cotton blend. Cotton is strongly recommended for structure and breathability.
Yarn B (contrast color, soft grey): Approximately 150 yards (137 meters) of the same weight, 100% cotton or cotton blend, in a soft grey or silver tone.
Hooks: US size G/6 (4.0 mm) for the bodice and flower. US size H/8 (5.0 mm) for the mesh panel and edging.
Notions: Yarn needle, scissors, 4 stitch markers, rust-proof pins for blocking, and optionally a small amount of fiberfill or a button to add dimension to the flower center.
Yarn Suggestions
- A mercerized cotton in ecru works beautifully here — excellent stitch definition and washes like a dream (you’ll need 3 skeins of ecru for Yarn A and 1 skein of silver for Yarn B).
- A cotton DK is another solid choice, though it runs slightly lighter so swatch carefully.
- An elastic cotton blend offers a bit of stretch, which helps the bodice hug without needing a lining.
Whatever you choose, avoid yarns with lots of halo or texture. You want the mesh to read clearly and those shell stitches to pop.
Gauge (Please Do Not Skip This)
- Bodice gauge with G/6 hook in single crochet: 18 stitches and 20 rows equals 4 inches by 4 inches (10 cm by 10 cm).
- Mesh gauge with H/8 hook: One mesh repeat (1 double crochet plus chain 2) equals 1 inch (2.5 cm) wide. One mesh row equals 0.75 inch (2 cm) tall.
This is a fitted garment — gauge matters. Always block your swatch before measuring because cotton relaxes significantly when wet.
Finished Measurements
This pattern is written for a 32 to 34 inch (81 to 86 cm) chest circumference.
- Bodice band: 30 inches wide by 6 inches tall (76 cm by 15 cm) before seaming
- Front mesh panel: Approximately 14 inches wide at top, 18 inches long, tapering to a point
- Back mesh panel: Approximately 14 inches wide at top, 12 inches long, tapering to a point
- Total length from top of bodice to lowest point of front tail: Approximately 24 inches (61 cm)
Abbreviations and Stitch Definitions
- ch (chain)
- sl st (slip stitch)
- sc (single crochet)
- dc (double crochet)
- hdc (half double crochet)
- sk (skip)
- sp (space)
- ch-sp (chain space)
- t-ch (turning chain)
- BLO (back loop only)
- RS (right side)
- WS (wrong side)
Special Stitches
Shell Stitch Edging
Work 5 double crochet stitches into the same stitch or space. This creates a fan or shell shape. When applying the shell edging to the mesh border, work 5 dc into each chain-2 space along the mesh edge, with a slip stitch between each shell in the connecting dc of the mesh.
Mesh Stitch Pattern
Multiple of 3 plus 2.
Row 1 (RS): dc in 4th ch from hook, (ch 2, sk 2 ch, dc in next ch) across, t-ch 3, turn.
Row 2: dc in first ch-2 sp, (ch 2, dc in next ch-2 sp) across, ending dc in top of t-ch, t-ch 3, turn.
Repeat Row 2 for pattern.
Step-by-Step Instructions
Section 1: Bodice Band
The bodice is a rectangle of dense single crochet worked flat. It forms the structured upper portion and is worked from bottom to top.
Using Yarn A and G/6 hook, chain 136.
Row 1 (RS): sc in 2nd ch from hook, sc in each ch across. Turn. (135 sc)
Rows 2 through 30: ch 1, sc in each st across. Turn. (135 sc)
After Row 30, do not turn. Fasten off.
Checkpoint: your piece should measure approximately 30 inches wide and 6 inches tall. The starting chain edge is the bottom of the bodice. Lightly steam or wet block flat before continuing.
Important: Mark the center 54 stitches (stitches 41 through 94) with stitch markers. This is your front center panel. The 41 stitches on each side are the side and back panels.
Section 2: Front Mesh Panel
The front mesh panel hangs from the lower edge of the center front 54 stitches. It tapers from full width to a single point, creating the front butterfly tail.
With RS of bodice facing, attach Yarn A with sl st to stitch 41 along the bottom foundation chain edge. Switch to H/8 hook.
Foundation Mesh Row (WS): ch 3 (counts as dc), sk next 2 ch, (dc in next ch, ch 2, sk 2 ch) 17 times, dc in stitch 94. Turn. (18 ch-2 spaces, 19 dc posts)
Mesh Row 1 (RS): ch 5 (counts as dc plus ch 2), dc in next ch-2 sp, (ch 2, dc in next ch-2 sp) 16 times, ch 2, dc in top of t-ch. Turn. (18 ch-2 spaces)
Mesh Row 2 (WS): sl st across first ch-2 sp and into next dc, ch 5, dc in next ch-2 sp, (ch 2, dc in next ch-2 sp) 14 times, ch 2, dc in next dc. Leave last ch-2 sp and t-ch unworked. Turn. (16 ch-2 spaces)
Mesh Row 3 (RS): sl st across first ch-2 sp and into next dc, ch 5, dc in next ch-2 sp, (ch 2, dc in next ch-2 sp) 12 times, ch 2, dc in next dc. Leave last ch-2 sp and t-ch unworked. Turn. (14 ch-2 spaces)
Mesh Row 4 (WS): sl st across first ch-2 sp and into next dc, ch 5, dc in next ch-2 sp, (ch 2, dc in next ch-2 sp) 10 times, ch 2, dc in next dc. Leave last ch-2 sp and t-ch unworked. Turn. (12 ch-2 spaces)
Mesh Row 5 (RS): sl st across first ch-2 sp and into next dc, ch 5, dc in next ch-2 sp, (ch 2, dc in next ch-2 sp) 8 times, ch 2, dc in next dc. Leave last ch-2 sp and t-ch unworked. Turn. (10 ch-2 spaces)
Mesh Row 6 (WS): sl st across first ch-2 sp and into next dc, ch 5, dc in next ch-2 sp, (ch 2, dc in next ch-2 sp) 6 times, ch 2, dc in next dc. Leave last ch-2 sp and t-ch unworked. Turn. (8 ch-2 spaces)
Mesh Row 7 (RS): sl st across first ch-2 sp and into next dc, ch 5, dc in next ch-2 sp, (ch 2, dc in next ch-2 sp) 4 times, ch 2, dc in next dc. Leave last ch-2 sp and t-ch unworked. Turn. (6 ch-2 spaces)
Mesh Row 8 (WS): sl st across first ch-2 sp and into next dc, ch 5, dc in next ch-2 sp, (ch 2, dc in next ch-2 sp) 2 times, ch 2, dc in next dc. Leave last ch-2 sp and t-ch unworked. Turn. (4 ch-2 spaces)
Mesh Row 9 (RS): sl st across first ch-2 sp and into next dc, ch 5, dc in next ch-2 sp, ch 2, dc in next dc. Leave last ch-2 sp and t-ch unworked. Turn. (2 ch-2 spaces)
Mesh Row 10 (WS): sl st across first ch-2 sp and into next dc, ch 3, dc in same dc. This creates the final point. Fasten off, leaving a 6-inch tail. (1 dc pair, point formed)
Checkpoint: the panel should hang approximately 14 to 16 inches from bodice to point.
Section 3: Back Mesh Panel
The back panel attaches to stitches 55 through 81 of the foundation chain (27 stitches, 9 mesh repeats).
With RS of bodice facing, attach Yarn A with sl st to stitch 55. Switch to H/8 hook.
Back Foundation Mesh Row: ch 3 (counts as dc), sk 2 ch, (dc in next ch, ch 2, sk 2 ch) 8 times, dc in stitch 81. Turn. (9 ch-2 spaces, 10 dc posts)
Back Mesh Row 1 (RS): ch 5, dc in next ch-2 sp, (ch 2, dc in next ch-2 sp) 7 times, ch 2, dc in top of t-ch. Turn. (9 ch-2 spaces)
Back Mesh Row 2 (WS): sl st across first ch-2 sp and into next dc, ch 5, dc in next ch-2 sp, (ch 2, dc in next ch-2 sp) 5 times, ch 2, dc in next dc. Leave last ch-2 sp and t-ch unworked. Turn. (7 ch-2 spaces)
Back Mesh Row 3 (RS): sl st across first ch-2 sp and into next dc, ch 5, dc in next ch-2 sp, (ch 2, dc in next ch-2 sp) 3 times, ch 2, dc in next dc. Leave last ch-2 sp and t-ch unworked. Turn. (5 ch-2 spaces)
Back Mesh Row 4 (WS): sl st across first ch-2 sp and into next dc, ch 5, dc in next ch-2 sp, (ch 2, dc in next ch-2 sp) 1 time, ch 2, dc in next dc. Leave last ch-2 sp and t-ch unworked. Turn. (3 ch-2 spaces)
Back Mesh Row 5 (RS): sl st across first ch-2 sp and into next dc, ch 5, dc in next dc. Leave last ch-2 sp and t-ch unworked. Turn. (1 ch-2 space)
Back Mesh Row 6 (WS): sl st into ch-2 sp, ch 3, sl st to dc. Fasten off. (point formed)
Checkpoint: the back panel should measure 8 to 10 inches from bodice to point.
Section 4: Halter Ties
Make 2 ties, each 30 inches long.
Using Yarn A and G/6 hook, chain 4. sc in 2nd ch from hook, sc in next ch, sc in last ch. Working in BLO, rotate and sc back along the cord. Continue working back and forth in BLO until the cord measures 30 inches. Fasten off leaving a 10-inch tail.
Attach one tie to stitch 94 at Row 30 (top-right corner of front panel). Attach the second tie to stitch 41 at Row 30 (top-left corner).
Section 5: Side Waist Ties
Work two cords, each 24 inches long, using the same method as the halter ties.
Attach one tie at the right side edge of the bodice at approximately Row 15. Attach the other at the left side edge at the same row.
Section 6: Grey Shell Stitch Edging
Using Yarn B and G/6 hook, attach with sl st to the first ch-2 space at the right upper corner of the front mesh panel.
Work (5 dc) into each ch-2 sp along the right diagonal edge, with sl st into the dc post between each shell. At the point, work (sc, ch 2, sc) to turn the corner. Continue up the left diagonal edge the same way. Sl st to the bodice edge to anchor. Fasten off.
Repeat for the back mesh panel.
Section 7: Top Edge Finishing
Using Yarn B and G/6 hook, attach at the left top corner with sl st. ch 1, sc evenly across the top edge of the bodice, placing 1 sc per stitch. Fasten off. (135 sc)
Section 8: Flower Applique
Large outer layer: Magic ring. Ch 3, work 15 dc into ring, sl st to join. (16 dc) Round 2: ch 1, sc in first dc, (ch 4, sk 1 dc, sc in next dc) 7 times, ch 4, sl st to first sc. (8 ch-4 loops) Round 3: Into each ch-4 sp work (sc, hdc, 4 dc, hdc, sc). Sl st to first sc. (8 petals) Fasten off.
Small inner layer: Magic ring. Ch 3, work 11 dc into ring, sl st to join. (12 dc) Round 2: ch 1, sc in first dc, (ch 3, sk 1 dc, sc in next dc) 5 times, ch 3, sl st to first sc. (6 ch-3 loops) Round 3: Into each ch-3 sp work (sc, hdc, 3 dc, hdc, sc). Sl st to first sc. (6 petals) Fasten off.
Center disc (Yarn A): Magic ring. Ch 1, work 6 sc into ring. Sl st to join. Fasten off.
Layer the flowers with the large one on bottom, small one on top, and disc at center. Sew together and attach to center front of bodice.
Finishing and Blocking
Wet block by soaking in cool water for 10 minutes. Lay flat, pin to dimensions, and shape each mesh tail into a perfect triangle. Allow to dry completely before unpinning.
Size Customization
- Size up (34 to 36 inch bust): Begin with chain 163. Attach front mesh to center 63 stitches. Back mesh uses 33 stitches.
- Size down (30 to 32 inch bust): Begin with chain 109. Attach front mesh to center 45 stitches. Back mesh uses 24 stitches.
Care Instructions
Machine wash cold on delicate in a mesh bag, or hand wash. Lay flat to dry. Never tumble dry or hang wet.
Final Thoughts
This halter top is one of those pieces that looks like it came from a boutique — the solid bodice gives it real structure, the mesh tails add drama and movement, and the two-tone cream and grey palette keeps it sophisticated. Make one for yourself and watch it become your favorite warm-weather top.