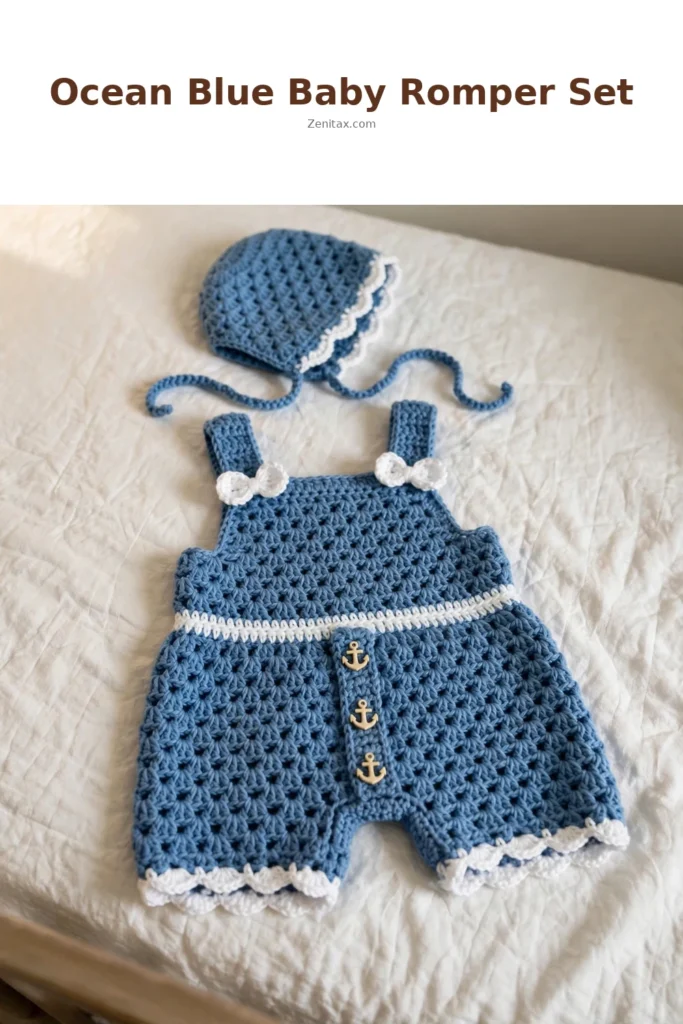
Some baby clothes are cute. Some are practical. And then there are the rare ones that are both — and that make you catch your breath a little when you unfold them from the tissue paper. This ocean blue romper and bonnet set is firmly in that third category.
The textured shell stitch bodice looks impressive but works up in a rhythmic pattern that you’ll memorize after the first repeat. The matching bonnet with its scalloped brim is the cherry on top. Together they make a perfect coming home outfit, christening look, or Sunday portrait ensemble.
What You Will Be Making
This crochet pattern produces a complete two piece baby set. You will make a bubble style romper with a textured shell stitch bodice, adjustable shoulder straps, decorative white bows, a contrast waistband stripe, scalloped picot edges at the leg openings, and three sweet anchor buttons at the crotch closure. The matching bonnet is worked from the crown outward with a shell stitch brim and long tie strings.
The overall vibe is vintage nautical. Think Sunday afternoon portraits, christening celebrations, or that perfect coming home outfit. The light blue main color with crisp white accents photographs beautifully and works for any baby regardless of gender.
Skill level: Intermediate. You should be comfortable working in rows and rounds, reading stitch counts, doing basic increases, and seaming pieces together. If you have completed at least one garment project before, you can absolutely do this.
Time estimate: Plan for roughly 12 to 18 hours total for the complete set, depending on your speed and experience level.
Finished Measurements
This pattern includes three sizes. All instructions are written for the smallest size, with changes for larger sizes given in parentheses in order.
Newborn (0 to 3 months):
- Chest circumference: 14 inches / 35.5 cm
- Length from shoulder to crotch: 11 inches / 28 cm
- Bonnet circumference: 13.5 inches / 34 cm
3 to 6 months:
- Chest circumference: 16 inches / 40.5 cm
- Length from shoulder to crotch: 12.5 inches / 31.75 cm
- Bonnet circumference: 14.5 inches / 37 cm
6 to 12 months:
- Chest circumference: 18 inches / 45.5 cm
- Length from shoulder to crotch: 13.5 inches / 34.25 cm
- Bonnet circumference: 15.5 inches / 39.5 cm
Materials Needed
Yarn:
- Main Color (MC): Light blue DK weight yarn, approximately 280 (320 / 370) yards
- Contrast Color (CC): White DK weight yarn, approximately 80 (95 / 110) yards
Hook: US size G-6 / 4.0 mm crochet hook
Notions:
- Yarn needle for weaving ends
- At least 6 stitch markers
- 3 decorative anchor shank buttons, approximately 15 mm diameter
- Sewing needle and coordinating thread for button attachment
- Scissors
- Rust-proof straight pins for blocking
Yarn Suggestions for This Baby Romper Crochet Pattern
You have options here depending on your budget and preferences.
Budget friendly option: Paintbox Yarns Simply DK in Cornflower Blue and Paper White. This is 100% acrylic, machine washable, and gives great stitch definition at a wonderful price.
Natural fiber option: A soft cotton DK in the same colors is breathable and lovely for warm weather, though it will be slightly heavier.
Gauge (Please Do Not Skip This)
I know, I know. Nobody loves making gauge swatches. But this is a fitted garment for a tiny human, and being even half a stitch off per inch can make the finished piece one or two sizes different than intended.
In Shell Stitch pattern, blocked:
- 1 shell repeat (6 stitches wide) = 1.25 inches / 3.2 cm
- 6 rows of Shell Stitch = 2 inches / 5 cm
In single crochet with G-6 hook:
- 18 sc = 4 inches / 10 cm
- 20 rows sc = 4 inches / 10 cm
Make a swatch of at least 24 stitches by 12 rows. Wash it, block it, let it dry completely, then measure. Adjust your hook size if needed.
Abbreviations Used
- beg: beginning
- BLO: back loop only
- CC: contrast color (white in this pattern)
- ch: chain
- ch-sp: chain space
- dc: double crochet
- hdc: half double crochet
- MC: main color (light blue in this pattern)
- pm: place marker
- rep: repeat
- rnd: round
- RS: right side
- sc: single crochet
- sc2tog: single crochet two together
Special Stitches Explained
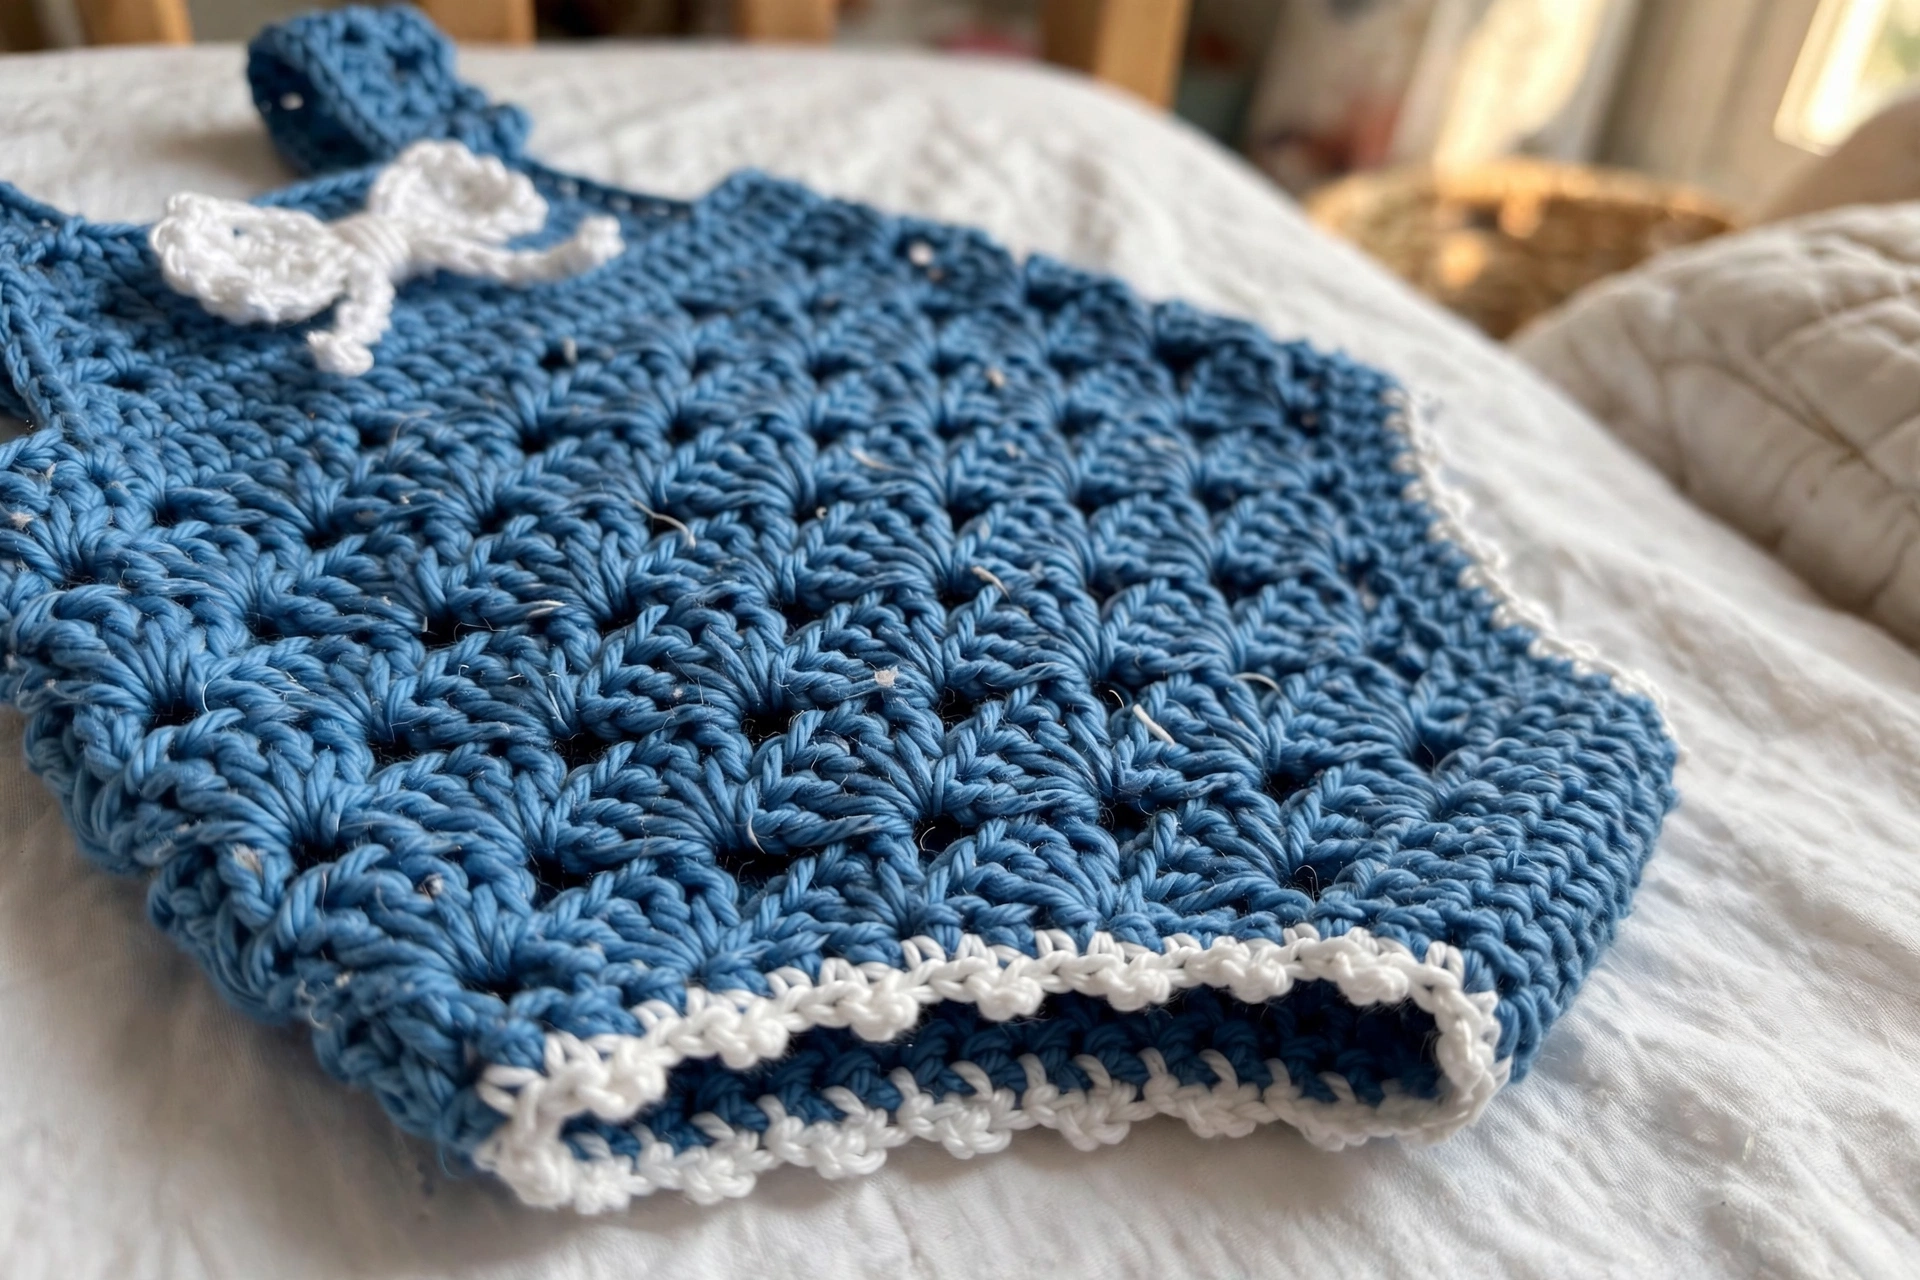
This pattern uses a beautiful shell stitch that creates the textured bubble effect you see in the photos. Do not let it intimidate you. Once you get the rhythm, it flows beautifully.
Shell Stitch (worked over a multiple of 6 stitches plus 2): A shell is 5 double crochet stitches all worked into the same stitch or space. The pattern alternates between shell rows and single crochet linking rows.
Shell Row (RS): Ch 3 (this counts as your first dc throughout the pattern), 2 dc in first st to create a half shell at the edge, sk 2 sts, sc in next st, sk 2 sts, 5 dc in next st for a full shell. Repeat the sequence of skip 2, sc, skip 2, 5 dc shell across until you reach the last 6 sts. Then sk 2, sc in next st, sk 2, 3 dc in last st for another half shell at the edge.
Single Crochet Row (WS): Ch 1, turn. Sc in first dc, ch 2, sk 2 dc, sc in next sc, ch 2, sk 2 dc, sc in center dc of shell. Repeat the ch 2, skip, sc sequence across, ending with sc in top of turning ch.
The half shells at each edge keep your sides straight and even. Each full shell uses 6 stitches from your foundation.
Picot Scallop Edging: This creates the delicate lacy edge you see around the leg openings and bonnet brim. Join yarn at any point, sc in first st, ch 3, sl st in first ch of ch-3 (you just made a picot), sc in next st, sk 1 st. Repeat around.
Crochet Bow (make 2): With CC, ch 16. Sl st in first ch to form a ring. Sc around the ring for 2 rounds (32 sc per round). Sl st to join. Cut yarn leaving a 12 inch tail. Pinch the oval in the center and wrap the tail tightly around the pinch 6 times. Knot securely on the back. Use remaining tail to sew bow to the strap base.
Romper Front Panel Instructions
Foundation
With MC and G-6 hook, ch 40 (46 / 52).
Row 1 (RS, Shell Row): Dc in 4th ch from hook (counts as first dc of half shell), dc in same ch, sk 2 ch, sc in next ch, sk 2 ch, 5 dc in next ch. Rep sk 2, sc, sk 2, 5 dc shell across to last 4 ch, sk 2 ch, sc in next ch, sk 1 ch, 3 dc in last ch. (38 / 44 / 50 foundation sts, forming 6 / 7 / 8 shells with half shells at each edge)
Row 2 (WS, SC Linking Row): Ch 1, turn. Sc in first dc, (ch 2, sk 2 dc, sc in next sc, ch 2, sk 2 dc, sc in center dc of shell) across, ending sc in top of t-ch. (13 / 15 / 17 sc, 12 / 14 / 16 ch-2 sps)
Row 3 (RS, Shell Row): Ch 3, turn. 2 dc in first sc (half shell), sk ch-2 sp, sc in next sc, sk ch-2 sp, 5 dc in next sc (center sc from previous shell). Rep sk ch-2 sp, sc in sc, sk ch-2 sp, 5 dc in next sc across, ending sk ch-2 sp, sc in last sc before final ch-2 sp, sk ch-2 sp, 3 dc in last sc. (38 / 44 / 50 sts)
Rows 4 through 16 (Row 4 through 18 / Row 4 through 20): Continue alternating Row 2 and Row 3 patterns until you have completed 8 (9 / 10) total Shell Rows and 8 (9 / 10) total SC Linking Rows from foundation. End after a SC Linking Row (WS row).
Checkpoint: Your piece should measure approximately 5 inches (5.5 inches / 6 inches) from foundation edge to working edge. If you are off by more than half an inch, recheck your gauge.
Waistband Stripe
Row Waist-1 (RS): Join CC with a sl st in first st of working edge. Ch 1. Sc across all sts of the SC Linking Row, working into the sc sts and into the center of each ch-2 sp to create a firm, even row. (38 / 44 / 50 sc)
Row Waist-2 (WS, Picot Trim): Ch 1, turn. Sl st in first sc, (ch 3, sl st in first ch of ch-3 just made, sl st in next sc) across. Fasten off CC. (19 / 22 / 25 picots)
Upper Bodice Section
Reattach MC with RS facing at the right edge of the waistband.
Row Bodice-1 (RS, Shell Row): Ch 3. Work a Shell Row into the sc sts of Row Waist-1, treating each sc as the foundation stitch. Half shell in first st, (sk 2, sc in next st, sk 2, 5 dc in next st) across, ending half shell in last st. (38 / 44 / 50 sts)
Continue alternating SC Linking Row and Shell Row for 6 (7 / 8) more rows, ending after a Shell Row (RS row). This is the top of your bodice.
Checkpoint: The full front bodice panel should now measure approximately 8.5 inches (9.5 inches / 10.5 inches) from foundation chain to working edge.
Armhole and Neckline Shaping
Now you will divide the bodice into three sections: left strap zone, center neck opening, right strap zone. Each strap zone is 6 stitches wide. The center 26 (32 / 38) stitches will be left open for the neckline.
Left Strap:
Row Strap-L-1 (RS): Work across first 6 sts only in Shell Row pattern (half shell, sk 2, sc in next st, sk 2, half shell). (6 sts)
Row Strap-L-2 (WS): Ch 1, turn. Sc, ch 2, sc, ch 2, sc. (3 sc, 2 ch-2 sps)
Rows Strap-L-3 through Strap-L-8: Continue alternating for 3 more complete Shell Row and SC Linking Row pairs. (6 sts per row)
Fasten off, leaving a 12 inch tail for seaming.
Right Strap: Skip the center 26 (32 / 38) sts. Rejoin MC at the 7th stitch from the left edge. Work the same as Left Strap Rows Strap-L-1 through Strap-L-8. Fasten off, leaving a 12 inch tail for seaming.
Romper Back Panel Instructions
The back panel is worked identically to the front panel with two exceptions:
- The back has NO neckline opening. The center stitches continue as the upper back body.
- Work 3 additional SC rows at the top before dividing for straps. This creates a slightly higher back for better fit and coverage.
Work the Foundation through Bodice-1 exactly as for the Front Panel.
Upper Back Extension
Row BackExt-1 (WS): Ch 1, turn. Sc across all 38 (44 / 50) sts. (38 / 44 / 50 sc)
Row BackExt-2 (RS): Ch 1, turn. Sc across. (38 / 44 / 50 sc)
Row BackExt-3 (WS): Ch 1, turn. Sc across. (38 / 44 / 50 sc)
Back Left Strap: Work identically to Front Left Strap across the first 6 sts for 8 rows. Fasten off with 12 inch tail.
Back Right Strap: Skip center 26 (32 / 38) sts. Work identically to Front Right Strap across the final 6 sts for 8 rows. Fasten off with 12 inch tail.
Crotch Flap and Button Placket
Front Crotch Flap
With MC, working into the foundation chain of the Front Panel, pick up and sc across the bottom 10 center sts of the foundation chain. (10 sc)
Row CF-1 (WS): Ch 1, turn. Sc across. (10 sc)
Row CF-2 (RS): Ch 1, turn. Sc across. (10 sc)
Row CF-3 (WS): Ch 1, turn. Sc across. (10 sc)
Do not fasten off. Work Picot Scallop Edging across the bottom of the flap. Fasten off.
Sew 3 anchor buttons evenly spaced across Row CF-3 using sewing needle and thread.
Back Crotch Flap
Work identically to Front Crotch Flap with 10 sc for 3 rows.
On Row BF-3, create 3 button loops evenly spaced: at each button loop position, ch 4, sk 2 sts, sl st in next st.
Work Picot Scallop Edging along the bottom. Fasten off.
Assembly
- Step 1: Block both panels flat to finished measurements. Allow to dry completely.
- Step 2: With RS together, seam the left side of the front to the left side of the back using whip stitch or mattress stitch. Match rows carefully. Seam from bottom of bodice up to armhole. Repeat for right side. Turn RS out.
- Step 3: Align front left strap RS to back left strap WS. Using the yarn tails, seam the strap tops together with a flat overcast stitch. Repeat for right strap.
- Step 4: Work Picot Scallop Edging around each leg opening. With CC and RS facing, join yarn at the side seam of one leg opening. Work sc and picots evenly around. Join with sl st. Fasten off. Repeat for second leg opening.
- Step 5: Attach front crotch flap to back crotch flap by overlapping front over back and buttoning through the loops.
Bonnet Instructions
The bonnet is worked in joined rounds from the crown outward.
Crown
Rnd 1: With MC, make a magic ring. Ch 2 (does not count as st). 8 sc in ring. Join with sl st to first sc. (8 sc)
Rnd 2: Ch 2. 2 sc in each sc around. Join. (16 sc)
Rnd 3: Ch 2. (Sc in next sc, 2 sc in next sc) around. Join. (24 sc)
Rnd 4: Ch 2. (Sc in next 2 sc, 2 sc in next sc) around. Join. (32 sc)
Rnd 5: Ch 2. (Sc in next 3 sc, 2 sc in next sc) around. Join. (40 sc)
Rnd 6: Ch 2. (Sc in next 4 sc, 2 sc in next sc) around. Join. (48 sc)
Size 0 to 3 months only: Proceed to Bonnet Body section. (48 sc)
Rnd 7 (3 to 6 months and 6 to 12 months only): Ch 2. (Sc in next 5 sc, 2 sc in next sc) around. Join. (56 sc)
Size 3 to 6 months only: Proceed to Bonnet Body section. (56 sc)
Rnd 8 (6 to 12 months only): Ch 2. (Sc in next 6 sc, 2 sc in next sc) around. Join. (64 sc)
Bonnet Body
Work even (no increases) in sc joined rounds for 10 (11 / 12) rounds. (48 / 56 / 64 sc per round)
Bonnet Brim
The brim is worked flat back and forth across only the front half of the bonnet (the face framing portion). This is the front 24 (28 / 32) sts.
Brim Row 1 (RS, Shell Row): Ch 3. Work shell row across the front 24 (28 / 32) sts. Turn. (24 / 28 / 32 sts)
Brim Row 2 (WS, SC Linking Row): Ch 1. Work sc linking row. Turn.
Brim Row 3 (RS, Shell Row): Ch 3. Work shell row. Turn. (24 / 28 / 32 sts)
Brim Edging: With CC, work Picot Scallop Edging across the outer edge of the brim. Fasten off CC.
Tie Strings
With MC, make two chains each 12 inches long (approximately 50 ch). Attach one chain with a sl st to each lower corner of the bonnet brim. Fasten off and weave in ends.
Finishing Your Baby Romper Set
Make 2 crochet bows using the instructions in Special Stitches. Sew one bow to the RS of each shoulder strap, centered at the junction between strap and upper bodice front.
Weave in all yarn ends securely, working ends in at least two directions for safety in baby garments.
Blocking: Handwash in cool water with gentle detergent. Press out excess water in a towel without wringing. Pin flat to finished measurements. For acrylic, hold a steam iron 1 inch above the surface without touching. For cotton, wet block. Allow to dry completely.
Care Instructions
Machine wash gentle in cool water with a baby-safe detergent. Lay flat to dry. Reshape the bonnet while damp for the prettiest brim.
Final Thoughts
This set is one of those projects that reminds you why you learned to crochet in the first place. The shells work up in a soothing rhythm, the bonnet comes together quickly, and the finished set is something a family will genuinely treasure. If you make one, I’d love to hear about it — leave a comment and tell me which size you made!



