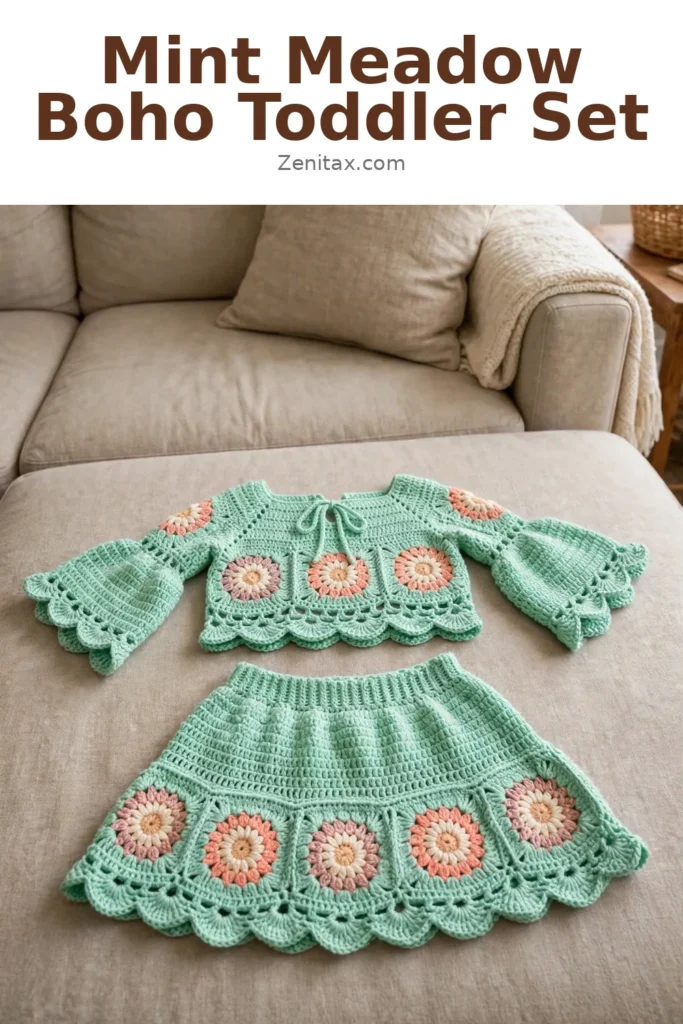
Oh friend, wait until you see this one. The Mint Meadow Boho Toddler Set is a two-piece dream: a cropped top with the prettiest bell sleeves and a twirly little skirt to match, all in soft mint green with peachy floral medallions. It is the kind of outfit that gets photographed a hundred times before lunch.
Yes, there are a lot of moving parts here: floral motifs, a top-down yoke, bell sleeves, a ribbed waistband skirt. But here is my promise to you: make all your motifs first, block them, and the rest falls into place beautifully. Let us walk through it together.
Materials Needed
Yarn: Main Color (MC): Mint green cotton DK weight yarn, approximately 650 yards / 595 meters total for both pieces. Color A (CA): Soft peach / coral, approximately 50 yards / 46 meters. Color B (CB): Warm white or cream, approximately 40 yards / 37 meters. Color C (CC): Soft yellow / golden yellow, approximately 30 yards / 27 meters. Color D (CD): Soft lavender / lilac, approximately 25 yards / 23 meters.
Substitution Note: Choose a smooth DK weight yarn in a fiber that is machine washable and gentle against sensitive skin. Cotton or cotton-blend yarns are strongly recommended because they hold the architectural scallop edging and circular motifs with beautiful definition. Avoid fuzzy or textured yarns as they will obscure the motif detail. Always work a gauge swatch before beginning.
Hooks: US size E-4 / 3.5 mm crochet hook (for motifs and main fabric). US size D-3 / 3.25 mm crochet hook (for waistband ribbing and neckline trim).
Notions: Stitch markers (at least 6). Yarn needle / tapestry needle. Scissors. Measuring tape. Approximately 18 inches / 46 cm of thin satin or grosgrain ribbon OR a length of chain made from MC for the neckline tie. Optional: small stitch holders or scrap yarn for holding stitches.
Gauge
With MC and US size E-4 / 3.5 mm hook: 18 sc x 22 rows = 4 inches / 10 cm in single crochet (blocked). 1 completed circular floral motif = 3.5 inches / 9 cm in diameter (blocked). Gauge is critical for a fitted garment. Adjust hook size up or down as needed to match gauge before beginning. I cannot stress this enough. Taking 15 minutes to check your gauge will save you hours of frustration later.
Finished Measurements
This pattern is written for size 2T (approximately 12 to 24 months, chest 21 inches / 53 cm).
Top: Chest circumference: 22 inches / 56 cm (with slight ease). Length from shoulder to hem: 10 inches / 25.5 cm. Sleeve length from underarm to bell cuff: 7 inches / 18 cm.
Skirt: Waist circumference: 20 inches / 51 cm (stretchy ribbed waistband). Hip circumference at widest point of lower tier: 26 inches / 66 cm. Length from waistband to hem: 9 inches / 23 cm.
Abbreviations (US Terms)
Let me walk you through every abbreviation you will encounter:
- beg = beginning
- BLO = back loop only (inserting your hook under just the back loop of the stitch instead of both loops)
- ch = chain
- ch-sp = chain space (the gap created by chain stitches)
- dc = double crochet (yarn over, insert hook, pull up loop, yarn over, pull through 2 loops, yarn over, pull through remaining 2 loops)
- dec = decrease
- FLO = front loop only
- hdc = half double crochet (yarn over, insert hook, pull up loop, yarn over, pull through all 3 loops)
- inc = increase (2 sc in same stitch)
- MC = main color
- pm = place marker
- rem = remaining
- rep = repeat
- rnd = round
- rs = right side
- sc = single crochet (insert hook, pull up loop, yarn over, pull through both loops)
- sc2tog = single crochet 2 together (a decrease where you work 2 stitches together as one)
- sk = skip
- sl st = slip stitch
- sm = slip marker
- sp = space
- ss = starting stitch
- st(s) = stitch(es)
- tch = turning chain
- tr = treble crochet
- ws = wrong side
- yo = yarn over
Special Stitches
- Shell Stitch: Work 5 dc all into the same stitch or space. This creates one shell unit that forms the scalloped border. When working the edging, shells are separated by: skip 2 sts, sc 1, skip 2 sts, then shell in next st, repeating across.
- Picot: Ch 3, sl st into the first ch of the 3-ch just made. This creates a small decorative loop used at the tip of each scallop shell.
- Join-As-You-Go (JAYG) for Motifs: When the final round of a motif instructs you to join to an adjacent motif, replace the ch 2 at one or more corner or side ch-sps with: ch 1, sl st into the corresponding ch-sp of the adjacent motif, ch 1. This joins the motifs flat without sewing.
- Reverse Single Crochet (Optional): Working from left to right (opposite the normal direction), insert hook into the next stitch to the right, yo, pull up a loop, yo, draw through both loops. This creates a neat twisted cord-like edge. This is optional and used only if the neckline edge feels unstable after assembly.
Circular Floral Motif
The circular floral motif forms the decorative medallion panels on both the top and the skirt. Each motif is worked in the round with no turning. Make all required motifs before assembling the garments, or join as you go using the JAYG method. Each finished motif measures 3.5 inches / 9 cm in diameter.
Color Sequence for Each Motif: Round 1: CC (yellow center). Round 2: CB (white/cream petal ring). Round 3: CA (peach/coral outer petal ring). Round 4: MC (mint joining/border round). Some motifs use CD (lavender) in place of CA for variety. Alternate as desired for a scrappy boho look.
Round 1 (CC): Make a magic ring (adjustable loop). Ch 3 (counts as first dc), work 11 dc into the ring. Sl st to top of beg ch-3 to join. Pull tail to close ring. (12 dc)
Round 2 (CB): Join CB to any st with sl st. Ch 1. Work (sc in same st, ch 3, sk 1 st) 6 times. Sl st to first sc to join. (6 sc, 6 ch-3 loops)
Round 3 (CA or CD): Join CA to any ch-3 loop. Ch 1. Work (sc, hdc, 3 dc, hdc, sc) all into each ch-3 loop around. Sl st to first sc to join. (6 petals, 42 sts total around outer edge)
Round 4 (MC): Join MC to the sc between any 2 petals (in the dip between petals). Ch 1. Work sc in same st. Ch 5. (Sc in next dip between petals, ch 5) 5 times. Sl st to first sc to join. (6 sc, 6 ch-5 arches)
The motif is now complete. Round 4 creates the joining arches that connect to the main fabric or to adjacent motifs.
Total Motifs Needed: Top: 3 motifs across the front upper body, 2 motifs on the sleeves (1 per sleeve). Skirt: 6 motifs across the lower tier front, 4 motifs across the lower tier back. Total motifs: 15 motifs (adjust if resizing).
Important Pattern Notes
- The top is worked from the top down in the round after a flat foundation, then split for front and back yoke, then rejoined at the underarms.
- The sleeves are picked up at the armhole and worked in the round downward with increases for the bell shape.
- The skirt is worked in the round from the waistband down.
- All stitch counts in parentheses at the end of a row or round reflect the total number of working stitches at that point.
- The scalloped shell edging uses the same formula for the top hem, sleeve hems, and skirt hem.
- Motifs are made separately and either joined as you go or seamed in with a yarn needle at finishing. The JAYG method is preferred for a cleaner look.
- When working in the round, do not turn unless instructed. Use a stitch marker to mark the first stitch of each round.
- The waistband of the skirt is worked with the smaller hook in BLO ribbing for stretch.
- Block all motifs before joining to ensure they lie flat and are uniform in size.
- The neckline tie is a separate crochet chain or ribbon threaded through the center-front ch-sp created during the yoke shaping.
The Top: Full Instructions
Neckline Foundation
Using MC and larger hook, ch 56. Join with sl st to form a ring, being careful not to twist. (56 ch) This chain forms the neckline edge. Place marker at the join to mark beginning of round.
Round 1 (neckline set-up, rs): Ch 1, sc in each ch around. Sl st to first sc to join. (56 sc)
Round 2 (yoke increase round 1): Ch 1. (Sc in next 6 sts, 2 sc in next st) 8 times. Sl st to join. (64 sc)
Round 3: Ch 1, sc in each st around. Sl st to join. (64 sc)
Round 4 (yoke increase round 2): Ch 1. (Sc in next 7 sts, 2 sc in next st) 8 times. Sl st to join. (72 sc)
Round 5: Ch 1, sc in each st around. Sl st to join. (72 sc)
Round 6 (yoke increase round 3): Ch 1. (Sc in next 8 sts, 2 sc in next st) 8 times. Sl st to join. (80 sc)
Round 7: Ch 1, sc in each st around. Sl st to join. (80 sc)
Round 8 (yoke increase round 4): Ch 1. (Sc in next 9 sts, 2 sc in next st) 8 times. Sl st to join. (88 sc)
Round 9: Ch 1, sc in each st around. Sl st to join. (88 sc)
Round 10 (yoke increase round 5): Ch 1. (Sc in next 10 sts, 2 sc in next st) 8 times. Sl st to join. (96 sc)
Round 11: Ch 1, sc in each st around. Sl st to join. (96 sc)
Round 12 (yoke increase round 6): Ch 1. (Sc in next 11 sts, 2 sc in next st) 8 times. Sl st to join. (104 sc)
Round 13: Ch 1, sc in each st around. Sl st to join. (104 sc)
Checkpoint: After Round 13, the yoke should measure approximately 3 inches / 7.5 cm from the neckline edge. The piece should lay flat and circular with 104 stitches.
Dividing for Armholes
Round 14 (separation round): The 104 stitches divide as follows: Front: 28 sts. Right sleeve: 24 sts. Back: 28 sts. Left sleeve: 24 sts. Total: 104 sts. Place markers: after st 28 (end of front), after st 52 (end of right sleeve), after st 80 (end of back), at st 104/1 (end of left sleeve, beginning of front). Ch 1. Sc across next 28 sts (front). Ch 4 (underarm bridge), skip next 24 sts (right sleeve stitches, place on holder). Sc across next 28 sts (back). Ch 4 (underarm bridge), skip next 24 sts (left sleeve stitches, place on holder). Sl st to first sc of front to join round. (56 sc + 8 ch = 64 working sts in body loop)
Body
Round 15: Ch 1. Sc in each of next 28 sc (front), sc in each of 4 ch (underarm), sc in each of 28 sc (back), sc in each of 4 ch (underarm). Sl st to join. (64 sc)
Rounds 16-17: Ch 1, sc in each st around. Sl st to join. (64 sc)
Round 18: Ch 1. (Sc in next 7 sts, 2 sc in next st) 8 times. Sl st to join. (72 sc)
Rounds 19-21: Ch 1, sc in each st around. Sl st to join. (72 sc)
Checkpoint: At this point the body tube from underarm to current row should measure approximately 3.5 inches / 9 cm.
Motif Integration (Body Front)
The front of the body has 36 sts (half of 72). The three motifs will be placed evenly across the front: motif 1 centered at front left, motif 2 centered at front center, motif 3 centered at front right. Each motif occupies approximately 12 sts of horizontal width at the connection points. To integrate motifs, lay the three motifs against the front fabric and use a yarn needle with MC to whipstitch the top arch of each motif’s Round 4 to the corresponding stitches of Round 21 on the front face, placing them evenly spaced.
Rounds 22-24: Ch 1, sc in each st around. Sl st to join. (72 sc)
Lower Body Lace Band
Round 25 (eyelet round): Ch 3 (counts as dc). Sk 1 st. (Dc in next st, ch 1, sk 1 st) around until 1 st rem. Dc in last st. Ch 1. Sl st to top of beg ch-3 to join. (36 dc, 36 ch-1 sps = 72 working units)
Round 26: Ch 1. (Sc in dc, sc in ch-1 sp) around. Sl st to join. (72 sc)
Round 27: Ch 1, sc in each st around. Sl st to join. (72 sc)
Top Hem Scallop Edging
Round 28 (shell setup): Ch 1. Sc in first st. Sk 2 sts. Work 5 dc in next st (shell made). Sk 2 sts. (Sc in next st, sk 2, 5 dc in next st, sk 2) around. Sl st to first sc to join. Check: 72 sts divided by 6 = 12 shells. (12 shells + 12 sc)
Round 29 (picot shell round): Sl st to center dc of first shell. Ch 1. Sc in same st. Ch 3, sl st to first ch (picot made). (Sc in center dc of next shell, picot) around. Sl st to first sc. Fasten off MC. Weave in ends. The bottom edge of the top is now finished with 12 scallop shells with picots.
Neckline Tie Opening
Return to the neckline. Using MC and smaller hook, join yarn at center front of neckline. Work 1 sc in center front, ch 5 for tie loop, sc into same spot, then work rev sc or sl st around remaining neckline if desired to stabilize. Alternatively, thread ribbon through any convenient eyelet near center front. Tie into a bow.
Checkpoint: The completed top body (before sleeves) should measure 10 inches / 25.5 cm from neckline to scallop hem tip.
Sleeves (Make 2)
Return the 24 held sleeve stitches to hook. Join MC to the first held sleeve stitch at the underarm with sl st.
Round 1 (sleeve pick-up): Ch 1. Sc in each of 24 held sts. Sc in each of 4 underarm bridge ch. Sl st to first sc to join. (28 sc)
Rounds 2-4: Ch 1, sc in each st around. Sl st to join. (28 sc)
Sleeve motif join: The single sleeve motif for each sleeve is attached to the outer sleeve (top of arm) at approximately this point, centered on the outer 14 stitches. Attach using yarn needle whipstitch to outer sleeve fabric.
Rounds 5-8: Ch 1, sc in each st around. Sl st to join. (28 sc)
Round 9 (bell inc 1): Ch 1. (Sc in next 3 sts, 2 sc in next st) 7 times. Sl st to join. (35 sc)
Round 10: Ch 1, sc in each st around. Sl st to join. (35 sc)
Round 11 (bell inc 2): Ch 1. (Sc in next 4 sts, 2 sc in next st) 7 times. Sl st to join. (42 sc)
Round 12: Ch 1, sc in each st around. Sl st to join. (42 sc)
Round 13 (bell inc 3): Ch 1. (Sc in next 5 sts, 2 sc in next st) 7 times. Sl st to join. (49 sc)
Round 14: Ch 1, sc in each st around. Sl st to join. (49 sc)
Round 15 (bell inc 4): Ch 1. (Sc in next 6 sts, 2 sc in next st) 7 times. Sl st to join. (56 sc)
Round 16: Ch 1, sc in each st around. Sl st to join. (56 sc)
Checkpoint: Sleeve from underarm to current row should measure approximately 5 inches / 12.7 cm. The bell should be visibly flaring.
Round 17 (eyelet): Ch 3 (counts as dc). Sk 1 st. (Dc in next st, ch 1, sk 1 st) around until 1 st rem before ch-3. Dc in that st. Ch 1. Sl st to top of ch-3. (28 dc, 28 ch-1 sps)
Round 18 (revised): Ch 1. (Sc in dc, sc in ch-1 sp) 26 times, 2 sc in next sp, sc in next sp, 2 sc in next sp. Sl st to join. (60 sc)
Round 19 (shell setup with 60 sts): 60 / 6 = 10 shell units. Ch 1. Sc in first st. (Sk 2, 5 dc in next st, sk 2, sc in next st) 9 times. Sk 2, 5 dc in next st, sk 2. Sl st to first sc. (10 shells)
Round 20 (picot shell): Sl st to center dc of first shell. Sc in same st. Picot. (Sc in center dc of next shell, picot) 9 times. Sl st to first sc. Fasten off. (10 picot shells) Repeat for both sleeves.
Checkpoint: Total sleeve length from underarm pick-up to picot shell tip should measure approximately 7 inches / 18 cm.
The Skirt: Full Instructions
Waistband
Using MC and smaller hook, ch 10. Row 1: Sc in second ch from hook. Sc in each ch across. Ch 1, turn. (9 sc) Rows 2 through 90: Sc in BLO of each st across. Ch 1, turn. (9 sc per row) After Row 90, the waistband strip should measure approximately 20 inches / 51 cm long (slightly stretched). Fold the strip and sl st the short ends together to form a ring. (90 rows, joined into a ring) This waistband is worked sideways and creates the ribbed elastic effect.
Checkpoint: The waistband ring should stretch comfortably to 20 inches / 51 cm in circumference and return to approximately 18 inches / 46 cm relaxed.
Skirt Body Pick-Up
Turn the waistband ring 90 degrees to work along the long edge. Using MC and larger hook, join to the top edge of the waistband and work 1 sc into each row-end ridge around the waistband. (90 sc) Pm at first st.
Round 1: Ch 1, sc in each st around. Sl st to join. (90 sc)
Round 2 (increase for hip ease): Ch 1. (Sc in next 8 sts, 2 sc in next st) 10 times. Sl st to join. (100 sc)
Rounds 3-4: Ch 1, sc in each st around. Sl st to join. (100 sc)
Round 5 (inc): Ch 1. (Sc in next 9 sts, 2 sc in next st) 10 times. Sl st to join. (110 sc)
Rounds 6-9: Ch 1, sc in each st around. Sl st to join. (110 sc)
Round 10 (inc): Ch 1. (Sc in next 10 sts, 2 sc in next st) 10 times. Sl st to join. (120 sc)
Rounds 11-12: Ch 1, sc in each st around. Sl st to join. (120 sc)
Checkpoint: After Round 12, the skirt body from waistband pick-up edge to current row should measure approximately 3 inches / 7.5 cm. Circumference should be approximately 26 inches / 66 cm.
Skirt Lace Band (Tier Transition)
Round 13 (eyelet): Ch 3 (counts as dc). Sk 1 st. (Dc in next st, ch 1, sk 1 st) around until last st. Dc in last st. Ch 1. Sl st to top of ch-3. (60 dc, 60 ch-1 sps)
Round 14: Ch 1. (Sc in dc, sc in ch-1 sp) around. Sl st to join. (120 sc)
Lower Tier
Round 15 (inc for lower tier flare): Ch 1. (Sc in next 5 sts, 2 sc in next st) 20 times. Sl st to join. (140 sc)
Round 16: Ch 1, sc in each st around. Sl st to join. (140 sc)
Round 17 (inc): Ch 1. (Sc in next 6 sts, 2 sc in next st) 20 times. Sl st to join. (160 sc)
Rounds 18-20: Ch 1, sc in each st around. Sl st to join. (160 sc)
Motif Integration for Skirt Lower Tier: After Round 20, attach the pre-made circular floral motifs to the lower tier using the yarn needle whipstitch method or the JAYG method. Place 6 motifs evenly across the front lower tier and 4 motifs across the back lower tier (10 motifs total for skirt). Each motif center sits at approximately Round 18, with its top edge stitched to Round 15 fabric.
Rounds 21-22: Ch 1, sc in each st around. Sl st to join. (160 sc)
Skirt Scallop Edging
Round 22 (adjusted): Ch 1. Sc in each st around, working sc2tog at 4 evenly-spaced points (every 40 sts). Sl st to join. (156 sc)
Round 23 (shell setup): Ch 1. Sc in first st. (Sk 2 sts, 5 dc in next st, sk 2 sts, sc in next st) 25 times. Sk 2, 5 dc in next st, sk 2. Sl st to first sc. (26 shells)
Round 24 (picot shell final): Sl st to center dc of first shell. Sc in same st. Picot. (Sc in center dc of next shell, picot) 25 times. Sl st to first sc. Fasten off MC. Weave in ends. (26 picot shells)
Checkpoint: Total skirt length from waistband to picot tip should measure approximately 9 inches / 23 cm.
Finishing Your Mint Meadow Boho Toddler Set
- Weave in all yarn tails on both pieces. Use the yarn needle to secure ends on the wrong side with 2 to 3 small anchoring stitches before trimming.
- Soak all motifs (if not already pre-blocked) and both garment pieces in cool water with a small amount of gentle wool or delicate wash. Gently squeeze out water without wringing.
- Lay flat on a blocking board or clean towel. Pin the scalloped edges out to their full width so each shell opens cleanly. Pin each motif to its finished diameter of 3.5 inches / 9 cm. Allow to dry completely.
- If using the whipstitch attachment method for motifs, check all join points and reinforce any loose areas with an extra stitch.
- For the neckline tie, cut a 20-inch / 51 cm length of ribbon or create a chain with MC and thread through the center front loop.
Tips for Success
This pattern has a lot of moving parts, so here are my best tips: Work all your motifs first. Seriously. Having them ready to go makes the integration rounds so much smoother. Block your motifs before attaching them. Unblocked motifs curl and distort, which makes joining frustrating. Use locking stitch markers generously. Mark your round beginnings, your armhole divisions, and your motif placement points. Try the garment on your little one (or a similarly sized doll or bear) as you go. Adjustments are much easier mid-project than after finishing. Do not skip the gauge swatch. This is a fitted garment and sizing matters.
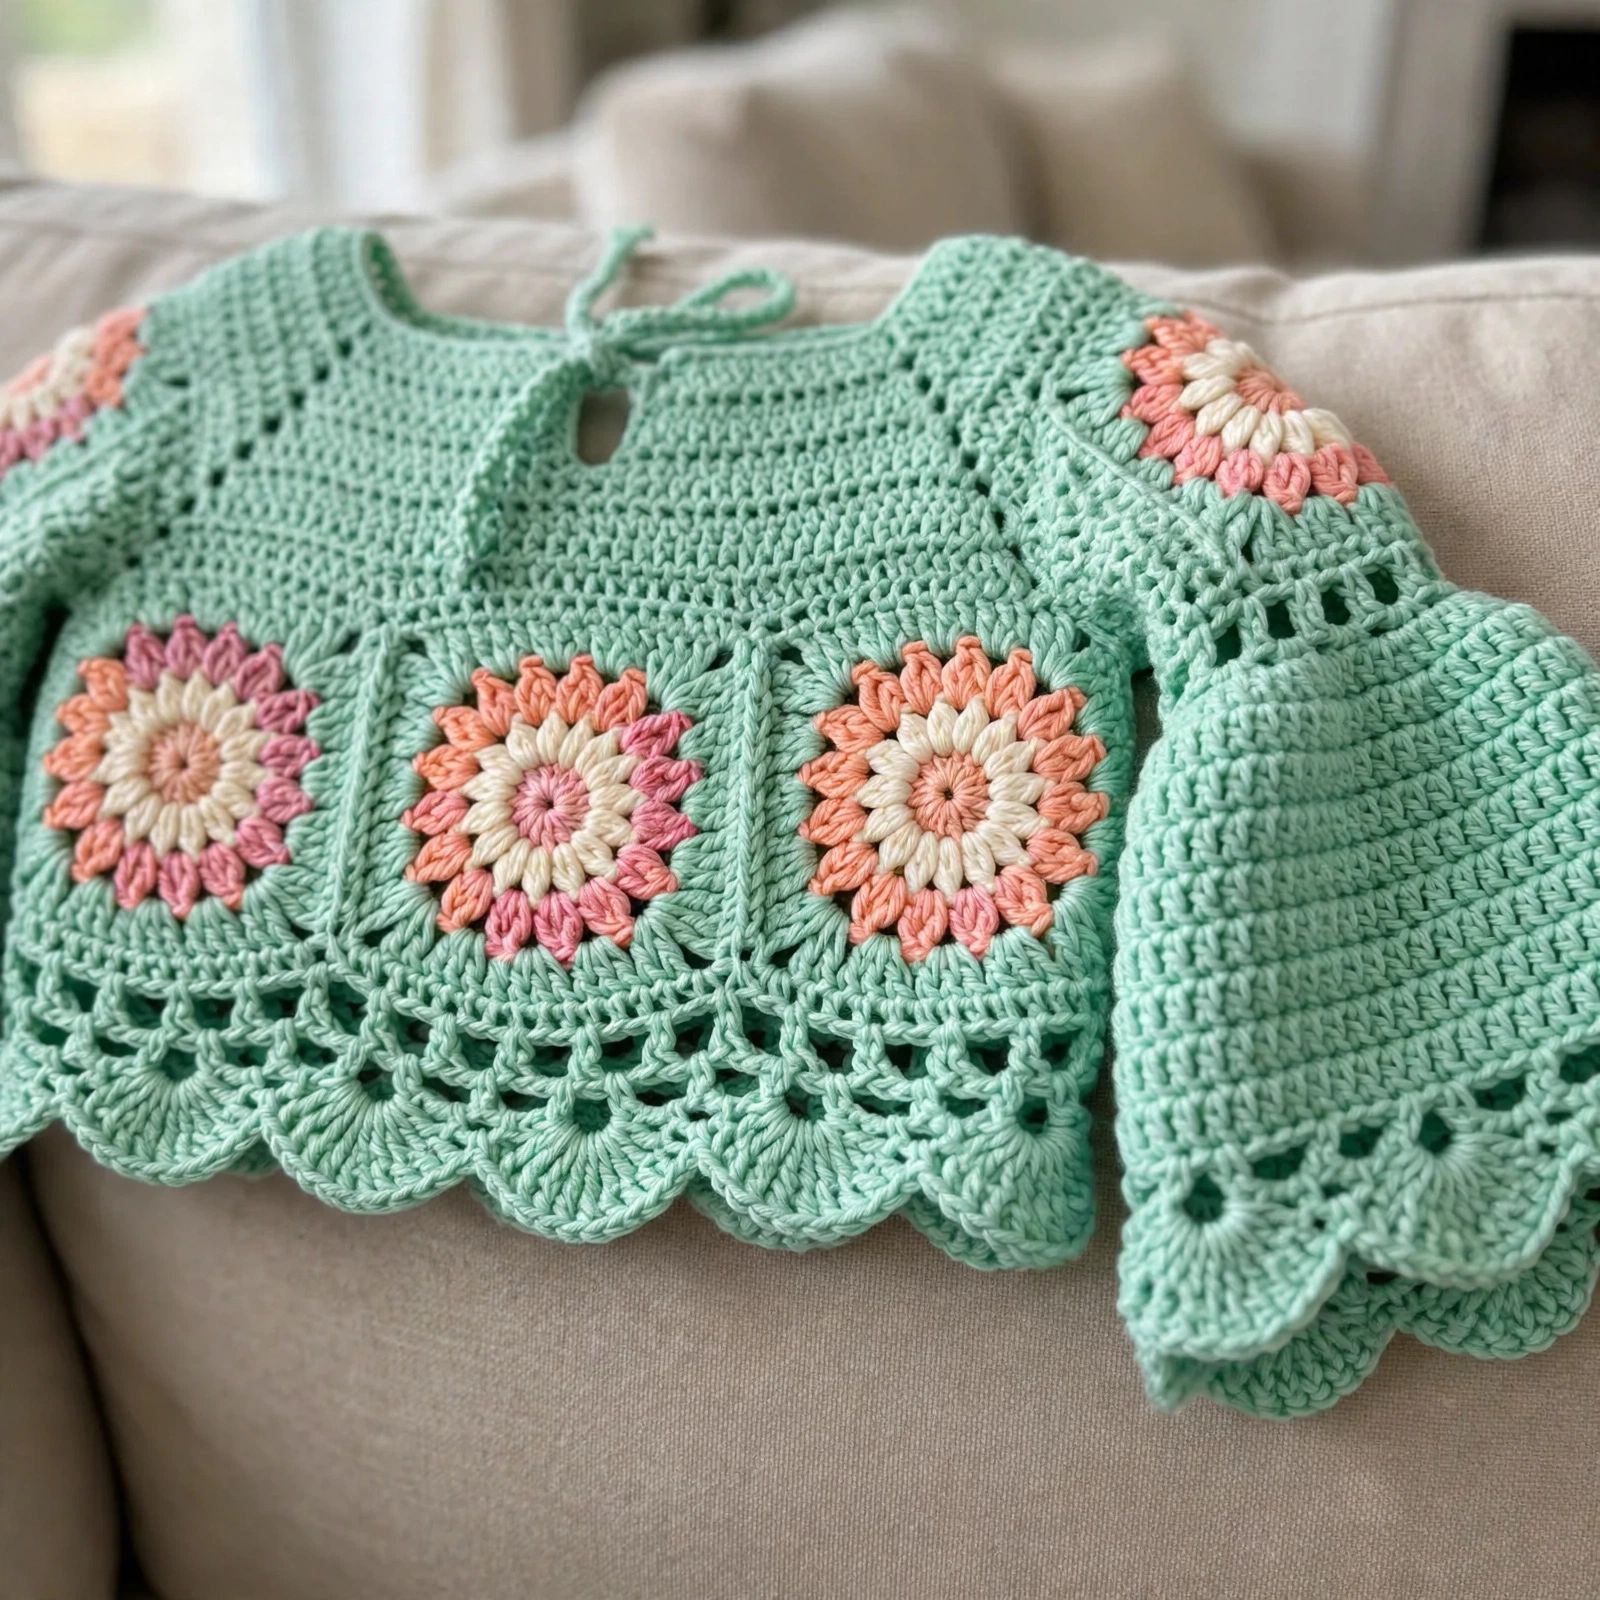
Final Thoughts
You just made it through this entire Mint Meadow Boho Toddler Set, and I am genuinely excited for you to start. This project has so many beautiful details, from the floral motifs to the bell sleeves to that gorgeous scalloped edging. Save it to your Pinterest boards so you can find it again later, and drop a comment below if you give this a try. I read every single one and I am always here to help if you get stuck. Happy crocheting, friend!



