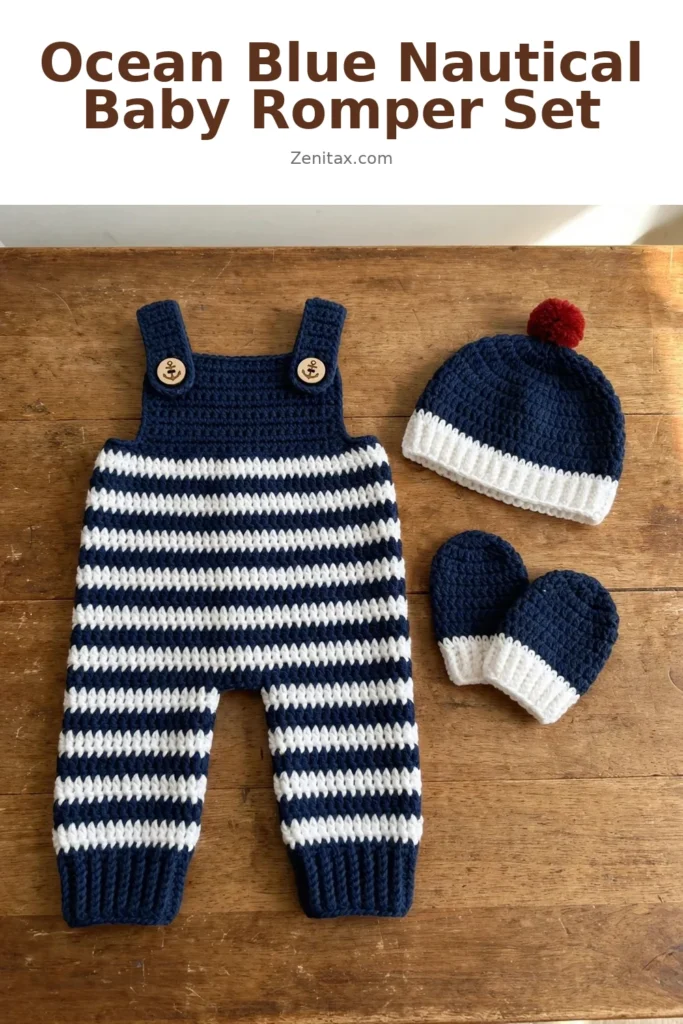
There is something about a tiny sailor outfit that just melts my heart. This little three-piece set has been living in my project notebook for ages, and I am so happy to finally share it with you. It includes striped overalls with the sweetest anchor buttons, a cozy beanie topped with a cheerful red pom-pom, and a pair of matching mittens. The whole thing works up in worsted weight yarn using basic single crochet, so even if you have never made baby clothes before, you can absolutely do this.
If you have been eyeing that navy yarn in your stash, consider this your sign to cast on.
Why You’ll Love This Crochet Pattern
This set hits every note for a baby gift. The crisp navy and white stripes look classic in newborn photos, the wooden anchor buttons give it that heirloom feel, and the red pom-pom on the hat is the perfect finishing touch. Because it is all single crochet, the fabric is dense, soft, and warm, exactly what you want against delicate skin. It also works up faster than you would think for a three-piece set.
Materials You’ll Need
- Yarn: Worsted weight (category 4)
- Color A (Navy): approximately 200 yards / 183 m
- Color B (White): approximately 80 yards / 73 m
- Color C (Red): approximately 5 yards / 4.5 m, for the pom-pom only
- Hook: US size G-6 / 4.0 mm (or size needed to meet gauge)
- Notions: Yarn needle for weaving in ends and seaming; 2 anchor-engraved wooden buttons, approximately 3/4 in / 19 mm diameter; scissors; 4 stitch markers; pom-pom maker or two cardboard circles (approximately 1.5 in / 3.8 cm diameter finished)
Stick with a smooth, machine-washable yarn here. Fuzzy or textured yarns will blur those crisp stripe lines, and parents will thank you for something they can toss in the wash.
Gauge (Do Not Skip This)
14 single crochet stitches x 16 rows = 4 in / 10 cm, worked flat in single crochet with a US G-6 / 4.0 mm hook.
I know gauge swatches feel tedious for small projects, but they matter enormously here. A difference of just 1 stitch per inch can make the overalls 2 inches too wide or too narrow. Work a swatch at least 5 in / 12.5 cm square, block it according to your yarn’s care instructions, and measure in the center.
Abbreviations
- ch: chain
- sl st: slip stitch
- sc: single crochet
- sc2tog: single crochet two together (decrease)
- st(s): stitch(es)
- rnd: round
- RS: right side (the side facing outward when worn)
- WS: wrong side
Special Techniques
Stripe Pattern (Worked in the Round)
This creates those beautiful alternating navy and white stripes. Round 1: Work all single crochet with Color A (navy). At the end of the round, drop Color A to the wrong side. Do not cut. Round 2: Pick up Color B (white). Work all single crochet with Color B. At the end of the round, drop Color B to the wrong side. Do not cut. Repeat these two rounds, carrying the unused color loosely up the inside of your work.
Clean Color Changes
When changing colors, complete the last yarn over of your last stitch with the new color. This produces crisp color lines instead of blurry transitions.
Adjustable Ring
Make a loop with your yarn, leaving a tail. Insert your hook into the loop, draw up a working loop, chain as instructed, then work your stitches into the ring. Pull the tail to close the ring tightly.
Overalls: Left Leg
With Color A and your G-6 / 4.0 mm hook, chain 29. Being careful not to twist, slip stitch to the first chain to form a ring.
Rnd 1: Ch 1, sc in each ch around, sl st to first sc. (28 sc)
Now work in Stripe Pattern:
Rnd 2: Ch 1, sc in each st around, sl st to first sc. Change to Color B at end of rnd. (28 sc)
Rnd 3: Ch 1, sc in each st around, sl st to first sc. Change to Color A. (28 sc)
Rnd 4: Ch 1, sc in each st around, sl st to first sc. Change to Color B. (28 sc)
Rnd 5: Ch 1, sc in each st around, sl st to first sc. Change to Color A. (28 sc)
Rnd 6: Ch 1, sc in each st around, sl st to first sc. Change to Color B. (28 sc)
Rnd 7: Ch 1, sc in each st around, sl st to first sc. Change to Color A. (28 sc)
Rnd 8: Ch 1, sc in each st around, sl st to first sc. Change to Color B. (28 sc)
Rnd 9: Ch 1, sc in each st around, sl st to first sc. Change to Color A. (28 sc)
Rnd 10: Ch 1, sc in each st around, sl st to first sc. Change to Color B. (28 sc)
Rnd 11: Ch 1, sc in each st around, sl st to first sc. Change to Color A. (28 sc)
Rnd 12: Ch 1, sc in each st around, sl st to first sc. Change to Color B. (28 sc)
Rnd 13: Ch 1, sc in each st around, sl st to first sc. Change to Color A. (28 sc)
Rnd 14: Ch 1, sc in each st around, sl st to first sc. Change to Color B. (28 sc)
Rnd 15: Ch 1, sc in each st around, sl st to first sc. Change to Color A. (28 sc)
Rnd 16: Ch 1, sc in each st around, sl st to first sc. Change to Color B. (28 sc)
Rnd 17: Ch 1, sc in each st around, sl st to first sc. Change to Color A. (28 sc)
Rnd 18: Ch 1, sc in each st around, sl st to first sc. Change to Color B. (28 sc)
Place stitch markers at the first and last stitch of the final round. Make the Right Leg the same way.
Overalls: Joining Legs to Form Body
Here is where the magic happens. You will connect both legs into one body tube. With Color A still attached to Right Leg:
Joining Rnd: Ch 4 (this creates the crotch bridge). Insert hook into the marked first stitch of Left Leg, sl st to join. Ch 1, sc in each st around Left Leg (28 sc), sc in each of the 4 ch of the bridge (4 sc), sc in each st around Right Leg (28 sc), sc in the 4 ch on the opposite side of the bridge (4 sc), sl st to first sc. (64 sc)
The two legs of 28 stitches each plus 8 bridge stitches equals 64 total stitches. Mark the beginning of the round and move it up each round. Begin Stripe Pattern again:
Rnd 1 (body): Change to Color B. Ch 1, sc in each st around, sl st to first sc. (64 sc)
Rnd 2 (body): Change to Color A. Ch 1, sc in each st around, sl st to first sc. (64 sc)
Rnd 3 (body): Change to Color B. Ch 1, sc in each st around, sl st to first sc. (64 sc)
Rnd 4 (body): Change to Color A. Ch 1, sc in each st around, sl st to first sc. (64 sc)
Rnd 5 (body): Change to Color B. Ch 1, sc in each st around, sl st to first sc. (64 sc)
Rnd 6 (body): Change to Color A. Ch 1, sc in each st around, sl st to first sc. (64 sc)
Rnd 7 (body): Change to Color B. Ch 1, sc in each st around, sl st to first sc. (64 sc)
Rnd 8 (body): Change to Color A. Ch 1, sc in each st around, sl st to first sc. (64 sc)
Rnd 9 (body): Change to Color B. Ch 1, sc in each st around, sl st to first sc. (64 sc)
Rnd 10 (body): Change to Color A. Ch 1, sc in each st around, sl st to first sc. (64 sc)
Rnd 11 (body): Change to Color B. Ch 1, sc in each st around, sl st to first sc. (64 sc)
Rnd 12 (body): Change to Color A. Ch 1, sc in each st around, sl st to first sc. (64 sc)
Fasten off Color B. Continue with Color A only.
Rnd 13 (body): Ch 1, sc in each st around, sl st to first sc. (64 sc)
Checkpoint: The body from crotch join to top should measure approximately 4 in / 10 cm. Total length from ankle to top should be approximately 9.5 in / 24 cm.
Overalls: Bib
The bib is worked flat on the front 28 stitches only. Count 18 stitches back from the round marker. Place a marker in stitch 1 and stitch 28 of your bib section. The remaining 36 stitches form the back panel and stay unworked.
With Color A, join yarn to stitch 1 of bib section.
Row 1 (WS): Ch 1, sc in each of next 28 sts, turn. (28 sc)
Rows 2 through 8: Ch 1, sc in each st across, turn. (28 sc)
Do not fasten off.
Checkpoint: The bib should measure approximately 4 in / 10 cm wide and 2 in / 5 cm tall.
Overalls: Straps (Make 2)
With Color A, chain 31.
Row 1: Sc in 2nd ch from hook and in each ch across, turn. (30 sc)
Row 2: Ch 1, sc in each st across, turn. (30 sc)
Row 3: Ch 1, sc in each st across. Fasten off, leaving a 12 in / 30.5 cm tail for sewing. (30 sc)
Each strap measures approximately 8.5 in / 21.5 cm long.
Attaching Straps and Buttons
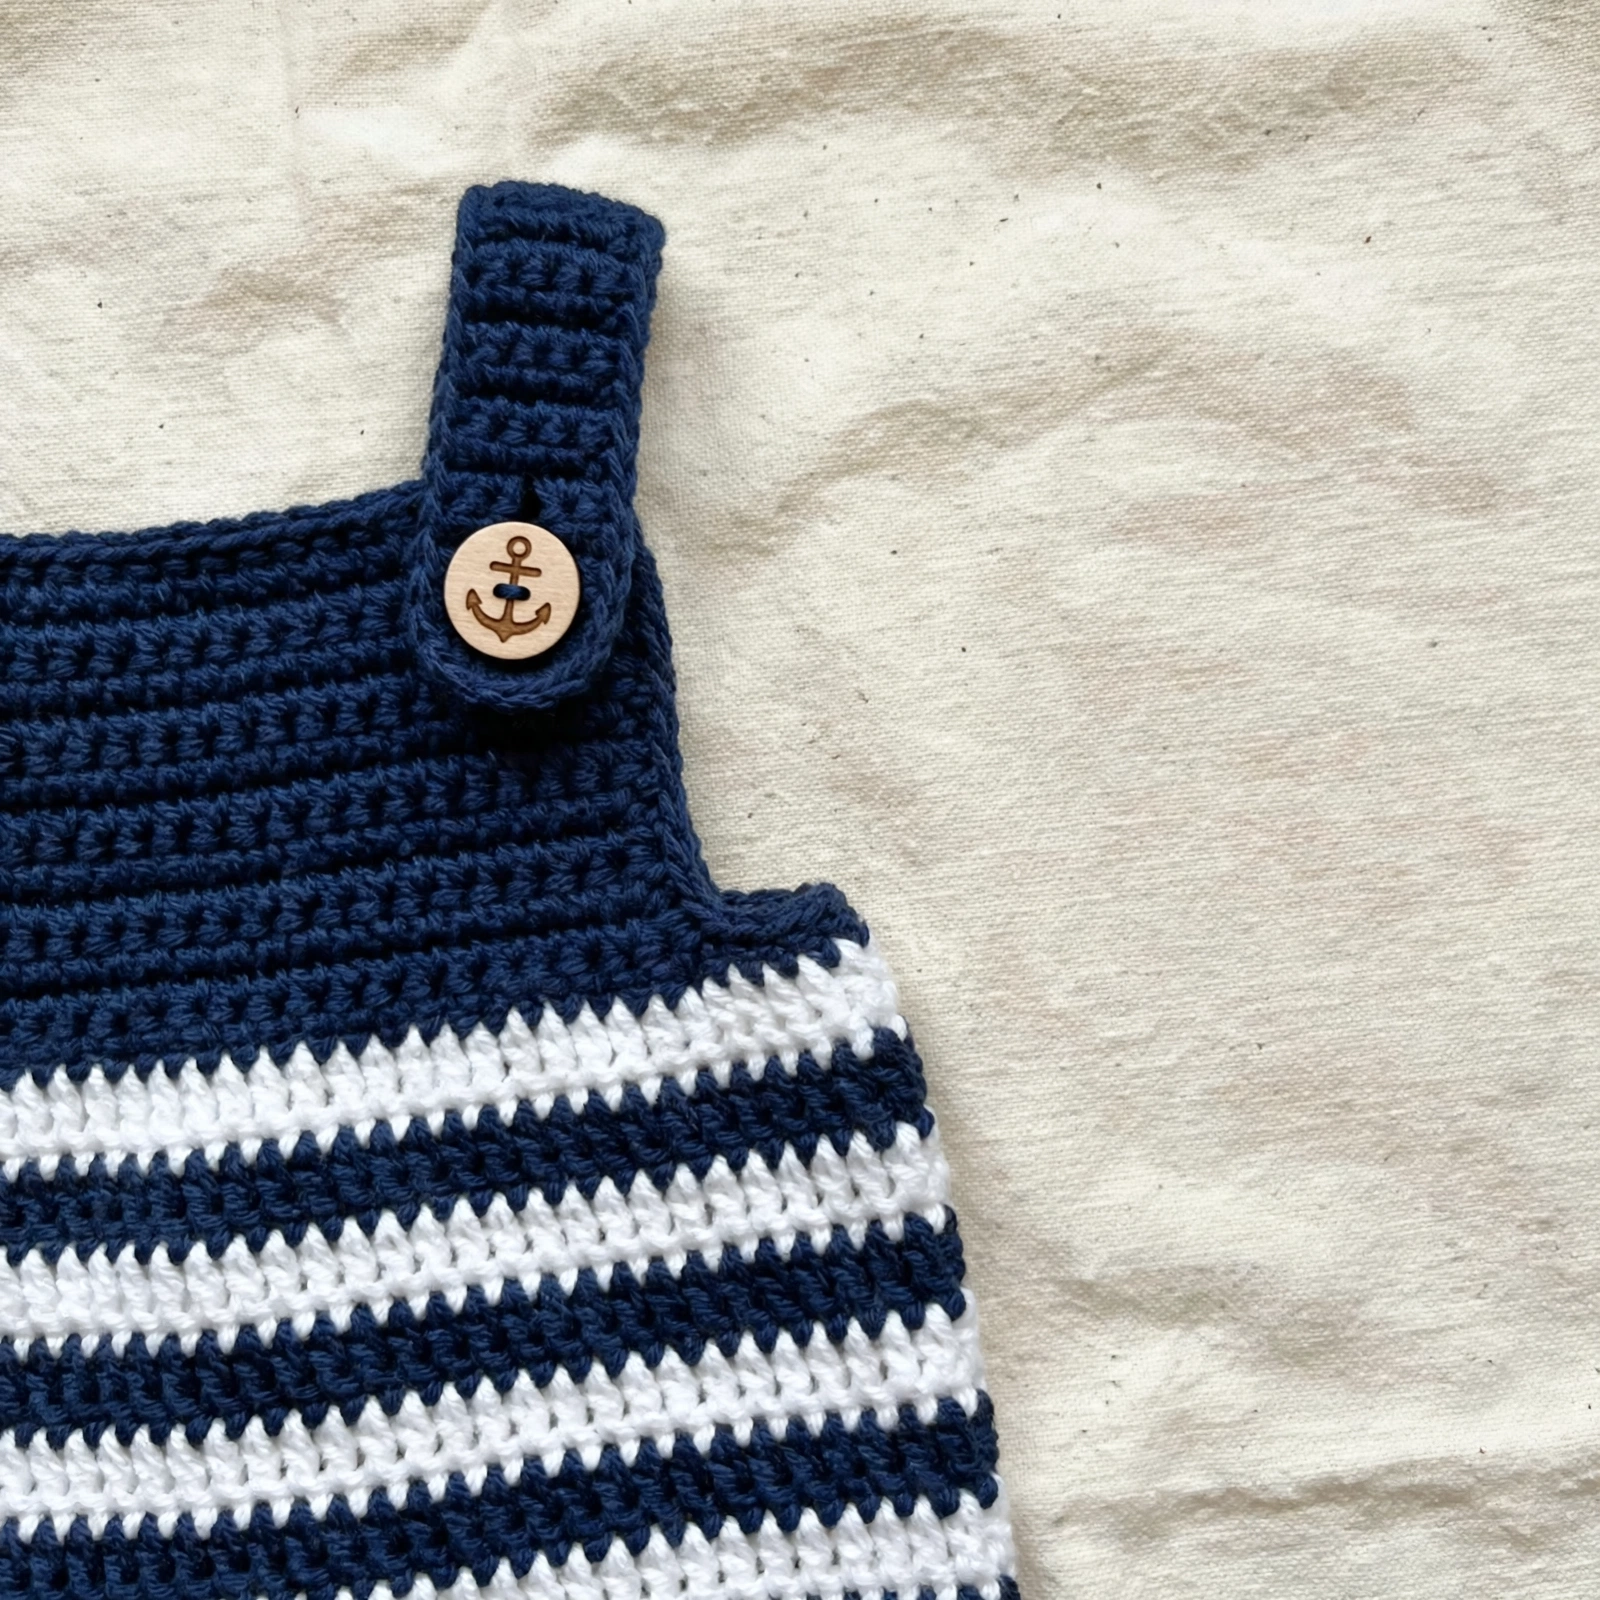
Fold the end of each strap under approximately 0.5 in / 1.25 cm. Whipstitch the strap end to the front bib top corners, leaving a small button loop by creating a 0.5 in / 1.25 cm gap. Thread a button through this loop and sew it firmly through both the strap fold and bib fabric. Sew the opposite ends of each strap to the back top corners of the body tube, approximately 4 stitches in from each outer edge. The straps should cross lightly in the center back when worn.
Hat
The hat is worked in the round from the brim upward. The lower section features stripes, and the crown is solid navy.
With Color A, chain 46. Being careful not to twist, sl st to first ch to form a ring.
Rnd 1: Ch 1, sc in each ch around, sl st to first sc. (45 sc)
Begin Stripe Pattern:
Rnd 2: Change to Color B. Ch 1, sc in each st around, sl st to first sc. (45 sc)
Rnd 3: Change to Color A. Ch 1, sc in each st around, sl st to first sc. (45 sc)
Rnd 4: Change to Color B. Ch 1, sc in each st around, sl st to first sc. (45 sc)
Rnd 5: Change to Color A. Ch 1, sc in each st around, sl st to first sc. (45 sc)
Rnd 6: Change to Color B. Ch 1, sc in each st around, sl st to first sc. (45 sc)
Fasten off Color B. Continue with Color A only.
Rnds 7 through 12: Ch 1, sc in each st around, sl st to first sc. (45 sc each round)
Checkpoint: After Rnd 12, the hat should measure approximately 3.5 in / 9 cm from the brim.
Crown Decreases
Rnd 13: Ch 1, (sc in next 7 sts, sc2tog) 5 times, sl st to first sc. (40 sc)
Rnd 14: Ch 1, (sc in next 6 sts, sc2tog) 5 times, sl st to first sc. (35 sc)
Rnd 15: Ch 1, (sc in next 5 sts, sc2tog) 5 times, sl st to first sc. (30 sc)
Rnd 16: Ch 1, (sc in next 4 sts, sc2tog) 5 times, sl st to first sc. (25 sc)
Rnd 17: Ch 1, (sc in next 3 sts, sc2tog) 5 times, sl st to first sc. (20 sc)
Rnd 18: Ch 1, (sc in next 2 sts, sc2tog) 5 times, sl st to first sc. (15 sc)
Rnd 19: Ch 1, (sc in next st, sc2tog) 5 times, sl st to first sc. (10 sc)
Rnd 20: Ch 1, sc2tog 5 times, sl st to first sc. (5 sc)
Fasten off, leaving a 6 in tail. Thread tail through remaining 5 stitches, pull snug to close. Weave in end.
Pom-Pom
Using Color C (red) and a pom-pom maker with approximately 1.5 in / 3.8 cm diameter, wrap yarn densely 80 to 100 times. Cut along the outer edge, tie a securing strand tightly around the center, and trim into a rounded ball. Attach securely to the hat crown tip.
Mittens (Make 2)
With Color A, chain 21. Being careful not to twist, sl st to first ch to form a ring.
Rnd 1: Ch 1, sc in each ch around, sl st to first sc. (20 sc)
Begin Stripe Pattern:
Rnd 2: Change to Color B. Ch 1, sc in each st around, sl st to first sc. (20 sc)
Rnd 3: Change to Color A. Ch 1, sc in each st around, sl st to first sc. (20 sc)
Rnd 4: Change to Color B. Ch 1, sc in each st around, sl st to first sc. (20 sc)
Fasten off Color B. Continue with Color A only.
Rnds 5 through 10: Ch 1, sc in each st around, sl st to first sc. (20 sc each round)
Checkpoint: After Rnd 10, the mitten body should measure approximately 2.5 in / 6.4 cm.
Tip Decreases
Rnd 11: Ch 1, (sc in next 2 sts, sc2tog) 5 times, sl st to first sc. (15 sc)
Rnd 12: Ch 1, (sc in next st, sc2tog) 5 times, sl st to first sc. (10 sc)
Rnd 13: Ch 1, sc2tog 5 times, sl st to first sc. (5 sc)
Fasten off, leaving a 6 in tail. Thread tail through remaining 5 stitches, pull snug to close. Weave in end.
Final Thoughts
And there you have it, a complete little sailor set ready for its debut. I love how the crisp stripes and those anchor buttons make it look like something from a boutique, even though it is just humble single crochet all the way through. This would make an unforgettable baby shower gift, or a treasured keepsake for your own little one. If you make one, I would love to hear how it turned out. Happy crocheting, friend!



